
Preface
This is my revision of the clear school glue guide that I wrote several months ago and posted on Reddit. Since originally writing this guide, I’ve learned even more information about this wonderful medium, and I will do my best to answer questions that have been raised by people that have referenced my guide.
Materials:
Clear school glue—you can get this many places. The cheapest source I have found it is Discount School Supply. You can go to Michael’s craft store and get it for around $14/gal, at Walmart for around $20/gal, and you can order it off Amazon for a few bucks less than that. So far, I’ve used Elmer’s brand, RoseArt, the Michael’s store brand and Amazon Basics, and did not notice any real variance in the consistency, and all work just fine. I have not used the clear school glue from Oriental Trading Company, but have heard it does not work very well, so I would avoid it. You can get anywhere from 6-10 beds from a gallon of glue, and you can reuse a bed 2-3 times (assuming you stick with the same color scheme with each disc), so it can be a very economical medium to use for disc dyeing.
Amazon Affiliate Link Disclosure: As an Amazon Associate we earn commissions from qualifying purchases made through some links on this post. There are no additional costs for you and it helps support our website. This does no affect which products are included in this post, and in most cases the writer is not aware of which brands and products offer us a sales commission.
Dyeing dish—use whatever you use for lotion dyes. I use a WHITE ultimate disc, it’s a great size. I have read of others using 9” cake pans as beds with good success. I would strongly advise to use a white bed, as it allows the colors you are putting into your bed to show up true, and you can really see how the bed is shaping up.
Dyes—for my style of dyes, I use a mixture of all available and viable dyes—ProChemical and Dye (PC&D) Disc Golf Dyes (which I have to throw in, these guys have been AMAZING at embracing the disc dyeing community—they’ve come out with so many new colors since I wrote this guide, and have gone out of their way to update and re-categorize a special section on their website for us, so that no one is confused about what dyes they need to use. Idye Poly also works well for dyeing discs, and has a few shades of color that are not available any other way. UV worm dip (both Quick Coat and Spike It) work with varying degrees of success and consistency) is fine, though many colors will not work very well (Spike It grape, Quick Coat blue), and they behave differently with the bed than the dye/acetone mixtures I use. There are also some colors that need additional dye put in them so their color vibrancy will match my other dye mixtures. I’ve never used Rit, but I strongly suspect it would not be effective and give the kinds of results I get. For those of you that have never tried PC&D dyes, you’re missing out. Every single color I’ve bought of theirs is of exceptional quality.
Glass jars/vials for mixing dye and solvent—I bought a bunch of these small glass vials in the craft section at Walmart, by the bead storage. Baby food jars work great too. DO NOT USE PLASTIC CONTAINERS FOR ANYTHING INVOLVING STORING ACETONE, IT WILL EAT THROUGH AND MAKE A HUGE MESS.
Solvent—so far, I only use acetone as a solvent. I also use clear worm dip if I want a color to be UV reactive, just use it the same way you would acetone. I have tried using a mixture of denatured alcohol/dye, but DA doesn’t dissolve as much dye into solution as acetone. Just be aware that the acetone can damage your stamp, but that can be largely avoided by making sure you let it evaporate off before you put the disc into the bed.
Glass eye-droppers—you need these to suck up the acetone out of your dye containers, again, make sure they are glass so the acetone doesn’t eat it. I’ve thought about using a syringe for ultra-precise and controlled application of dye, but haven’t gotten around to trying to find a syringe yet. I keep a shot glass filled with acetone to rinse out my droppers between colors.
Methods:
I feel like this is a great method for anyone to be able to get great results. It isn’t as fussy as lotion, especially if you get into building layers, doing dirty pours, etc, and don’t have as much of a problem with colors blending to form brown, provided you are spacing out your color on the bed adequately.
Clear school glue is very different from white glue! I’ve not done many white glue beds, because when I do, I just don’t get the kind of rich, vibrant color that I am looking for. Something about the white glue causes the molecules of dye to bond to it before anything else, and always seems to give me muted colors. However, clear glue does not mute colors, and it is a very fun medium to play with, and has a variety of ways you can manipulate the colors across the bed. Think of this method as if you’re creating an oil slick, and then moving the oil around on top of water.
It reminds me a lot of videos I’ve seen of people using spray paint and water tanks to hydrodip things. However, as with all things, there are right and wrong ways to do things, and there are a handful of pitfalls that you want to be sure to be mindful of so that you have the best opportunity at a successful dye that you’re thoroughly happy with.
Preparations:
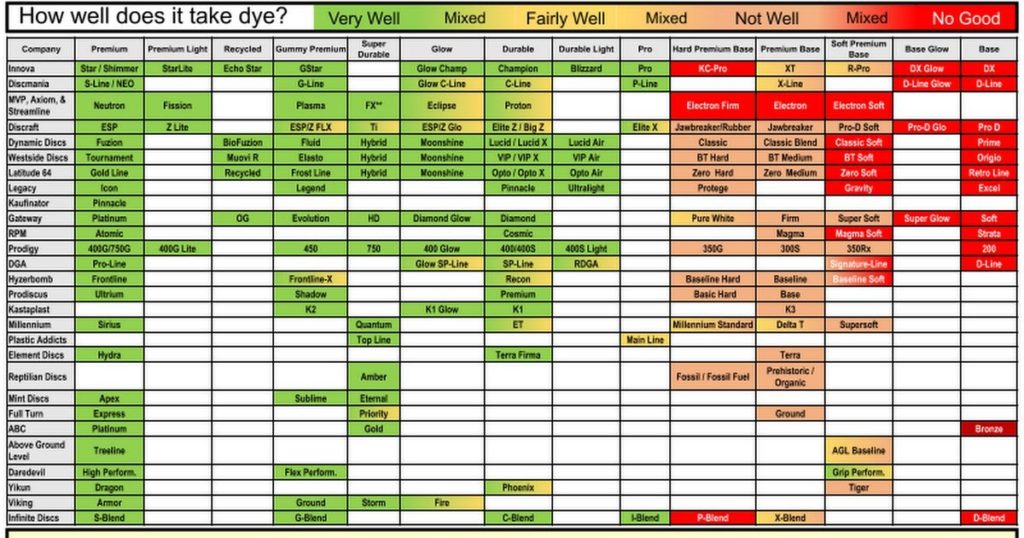
There are several things that you need to be mindful of when dyeing a disc. Firstly, you need to make sure that you are using a disc made of plastic that will take dye. Baseline plastics (Innova DX, Discmania Active, among others) as well as soft putter plastics generally do not take dye, and you’re wasting your time trying to dye them. Some soft putter plastics will take a bit of dye, but some will also slowly leach dye onto your hands and the surrounding discs in your bag. Stick to premium plastics. I have attached a copy of this handy chart sourced by Scott Case.
Before you start building your bed, you need to be sure and clean your disc very well. There are a variety of brands/plastic types (Kastaplast K1/K1 Soft, Trilogy Opto/Gold/Chameleon/Glimmer, Streamline Plasma, Mint Sublime plastic, among others) where during the manufacturing process, there is a silicone-based spray used inside the molds during the plastic injection process that allows the disc to release cleanly from the mold. However, unfortunately this solution can be very difficult to clean off and can sabotage an otherwise great dye job. There are several things you can do to clean it off:
First, wash the disc with dish soap and HOT water. Then, use a rag and put some 90+% isopropyl or denatured alcohol on it and scrub the disc (be careful, I have accidentally damaged foils on Trilogy/Innova/Discmania discs just by trying to clean the disc). Then, use a well-soaked magic eraser to scrub the disc (again, be careful around the stamp—if you stay in one place too long, you can damage the stamp), and then, wash the disc AGAIN with dish soap and hot water.
When pouring your glue into your dish, be sure to not shake up the glue or do anything that put air bubbles in the glue. Some people don’t mind bubbles, and some actually like them, but I view them as an eyesore, and do everything I can to avoid them. Slowly pour the glue into the bottom, I fill my ultimate disc with about 1/2”-1” of glue, depending on how domey the disc is. If you see air bubbles, you can try picking up the dish an inch or two off the table and dropping it repeatedly to bring the air bubbles to the surface, but I just use a blow torch to bring the bubbles up and pop them. Think like you’re making a creme brûlée.
Another key thing I have found to reduce bubbles is to sand the bottom of your ultimate disc with 800 grit sandpaper until it is very smooth and polished. Since I started doing this, I noticed I do not get random air bubbles that form on the bottom of the bed and the rise to the top.
Next, you need to make sure your dye solution is ready. People ask me a lot, “What are your ratios?” Simple fact of the matter is, I do not use exact ratios. For me, the goal is to get as much dye into your solvent as can be held in suspension. Your solvent will only be able to hold so much dye, and the rest will settle on the bottom, and that’s fine. I’d rather have too much dye than not enough. A good starting point is about a 10:1 ratio of acetone to dye. You need to make sure that you leave enough time for your dye mixture to “steep”, much as you do when you make coffee or tea. You can help this along by putting your TIGHTLY CAPPED mixtures on a heating pad, or set them in a hot water bath for an hour or so.
Make sure you have several different eye droppers. If you have a dedicated dropper for each color, that is best, but if not, you need to at least stick to the same color spectrum for one dropper—otherwise, there’s a good chance you’ll cross-contaminate your dye. This is especially important when dealing with light colors like chartreuse yellow worm dip.

Color selection: If you don’t know about the color wheel and complimentary colors, I’d highly recommend familiarizing yourself with it. When I started dyeing, I didn’t know much, and relied on my color wheel to tell me which colors work well together. It is important to consider the color of your disc when choosing the colors of dye you want to use. For example, if you have a yellow disc, and you put blue dye on it, it’s going to turn out green. If you put red dye on green plastic, you’re gonna get this weird brown color. If your disc isn’t white, start with the color of the disc and the color of your stamp to lead you to complimentary colors. Also, look to nature! Think about colors in sunsets, in space nebulas, etc.
Dye application: So you’ve got your colors picked and you’re ready to go! Start by sucking up some dyed acetone into your dropper. I like symmetry and patterns most of the time. Start out with your lightest color, and start dripping the dye on the bed. Don’t be heavy-handed with the dye—single drops right above the bed work best. You can experiment with dropping it from different heights, the higher you drip it from, the more it will spread, and it will produce a lighter color than if you do it just above the surface. Start with your lightest color, and work your way to your darkest color. There are some folks out there who use this method that like pouring big pools of dye onto the bed, so if that’s what you prefer, then go for it!
Once you have a nice coverage of dye across the top, you’re ready to swirl. I personally like to use a toothpick, and I try to not swirl too much. After you swirl, you can either look for blank spots that you’ve created (you’ll understand what I mean when you swirl your dye around and see how they push/stack together and create new empty space) and put another layer of dye wherever you like, or you can just stop there. Also, try using a straw to use air to manipulate the color across the bed. The look achieved is very different.
Laying the disc: First, make sure you have thoroughly cleaned your disc! If there’s any residual oil on your disc, it will repel the dye. The way I lay the disc down is dependent upon the shape/contour of the disc. If it’s domey, I will hold it by the edges and just lower it directly down onto the bed. If it’s a flat disc, I will tip it up to about 45°, and lay an edge of the disc on the edge of the bed, and gently lay/rock it into place. Then, push gently until you see the glue come up to the edge of the disc. Then, just let it set for however long the type of plastic you’re using would require from a lotion dye. Do not put any weight on top of the disc while it soaks, it’s not necessary.
Some people like to use heat, but I do not, because it promotes color blending.
In regards to set times, I have seen people vary widely on this. Look, I get it—you’re stoked, and you can’t wait to get that disc out of the bed to see how it looks! However, before you do, please consider this—your disc has the whole rest of its life to NOT be absorbing color. Also, your dye will begin fading from the moment it is taken out of the bed, some plastics more quickly than others. Isn’t it worth being patient, and trying to get as much color into your plastic as possible? I certainly think so. I always let my discs soak a minimum of 24 hours, but on clear/Champion-like plastics, I’d highly recommend a 72+ hr set time.
After the soak time is complete, it’s time to remove the disc from the bed! If you want to use the same color scheme on your next disc, you can set your bed aside and reuse your bed again and it will work fine. Lift the disc out of the bed, and wash it off in the sink with hot water and a scrubby sponge. Be sure to focus along the edges/rim of the disc to make sure you get all of the glue off.
If you have air bubbles that you’d like to touch up, I recommend using a toothpick to dip into your dye mixture, and fill in the bubbles.
Hopefully this guide has helped de-mystify this process a bit.
Good luck, and reach out to me if you’d like to ask me any questions!


4 thoughts on “How to Dye Discs with Clear School Glue”
In the school glue article, you mention letting the acetone evaporate so it doesn’t damage the stamp, how long does this take and do i let it evaporate in the bed or in my containers?
Just a few minutes is all that’s needed. The way I build my beds, the last step of the process is manipulating the bed with air and a straw, so it’s probably 5 mins from the last time that I add dye to the bed to putting the disc in, and I very rarely have any kind of stamp damage.
I purchased an Innova U-Dye Champion plastic disc. What method of dying do you recommend? I have already purchased a Pro-Chem beginner Dye Kit.
I feel like you would get the best results on Champion plastic with either lotion or floetrol. Champion can be stubborn, and not saturate very well—I feel like it’s easiest to pack color into stubborn plastic easier with those two mediums. You can still get good results with a glue bed as well, but make sure you don’t skimp on dye in your bed, and let it set 72 hrs. If you have a heat lamp, I’d put the glue bed under a lamp at around 105-110° (if you have an infrared thermometer—a CRITICAL piece of equipment when using heat) for the last 2 hrs of that 72 hr soak.